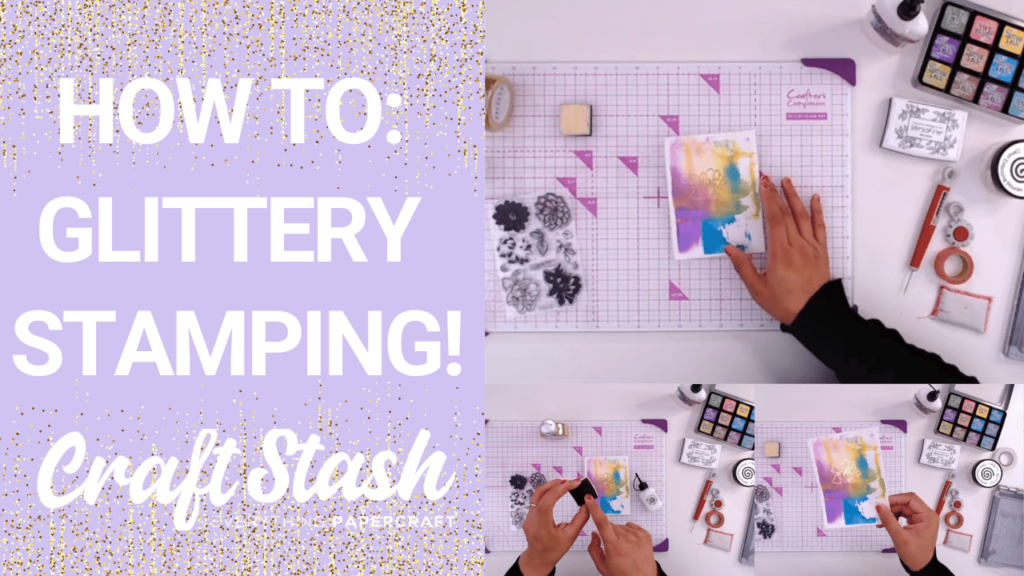
HOW TO: Glitter stamping - no heat required!
If you're a fan of adding a touch of sparkle to your stamped creations but want to skip the heat embossing process, you're in for a treat! Find out how to add glitter to your stamps without using any heat!
If you're a fan of adding a touch of sparkle to your stamped creations but want to skip the heat embossing process, you're in for a treat! Find out how to add glitter to your stamps without using any heat!
Find our wide range of stamps and stamping accessories here!
How to add glitter to your stamps without heat embossing:
Getting Started: To achieve the glitter stamping effect, we'll be using a few key supplies: stamps, glitter, flake, glitter glue, and cut and foam. The adhesive we'll be using is the Cosmic Shimmer Flake and Glitter Glue, specially formulated for this technique. This adhesive remains tacky, ensuring that your glitter adheres perfectly.
Prepare Your Workspace: Set up your crafting area with all your supplies. You'll need your stamping block, stamps, Cosmic Shimmer Flake and Glitter Glue, glitter, and cut and foam.
Apply the Adhesive: Apply the Cosmic Shimmer Flake and Glitter Glue onto the spongy side of the cut and foam. This adhesive will remain tacky, allowing the glitter to adhere effectively.
Ink Your Stamp: Select your desired stamp and mount it onto your stamping block.
Stamp with Tacky Glue: Dab the adhesive-covered cut and foam onto the stamp image to cover it evenly. Be generous with the adhesive but work quickly, as the glue dries rapidly.
Stamp Your Image: Press the adhesive-covered stamp onto your cardstock, making sure not to let it dry before stamping. Lift the stamp gently to avoid tearing the paper.
Apply Glitter: Immediately, sprinkle your chosen glitter onto the adhesive-covered stamped image. Ensure that the glitter adheres well to the tacky adhesive.
Press and Burnish: Using the opposite side of your stamping block or a plastic bag, gently press and burnish the glitter into the adhesive. This step ensures that the glitter adheres securely.
Set and Finish: Allow your glittery stamped image to dry for about five minutes. Then, use your finger to gently rub over the glitter to further secure it. Brush away any excess glitter using a clean, dry brush.
And there you have it, you've learned how to create stunning glittery stamped images without the need for heat embossing! Now you can achieve a sparkling effect that will elevate your paper crafting projects to a whole new level. Don't forget to clean your stamps promptly to prevent any tackiness. Give this technique a try, and watch your stamped creations come to life with shimmer and shine!
Watch the glitter stamping video here!
If you love stamping and want to see more, check out our stamping tips and tricks playlist here!
Recent Posts
-
 Categories: AllFree Download
Made To Surprise Papercraft Society Free Downloads
Free Made To Surprise Papercraft Society Box Downloads! -

-
 Categories: All
Creative Ways to Use Cover Plate Dies in Your Cardmaking Projects with New Celebrate Blossoms Release from Justine Hovey
New Celebrate Blossoms from It's Just Paper -
-