
Step by Step: Fancy Bow | Gift Box Collection | Crafting Diva
Step by Step: Fancy Bow
Lisa Plummer, the Crafting Diva, demonstrates how to construct a stunning Fancy Bow. From the Gift Box Collection by Creative Dies Plus, the Fancy Bow die set is extremely versatile, allowing you to decorate a range of papercrafts. They also co-ordinate beautifully with the box and bag die sets within the range. Go potty for polka dots or say it with stripes: you choose!
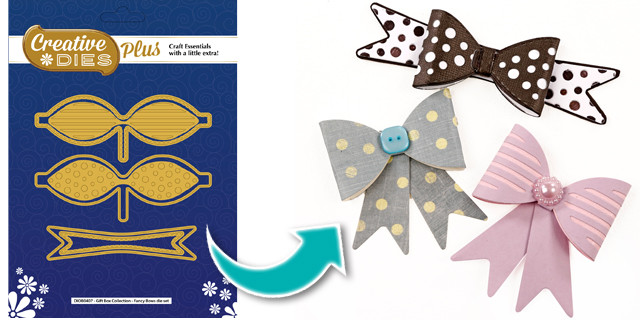
Pick up your Gift Collection dies today!
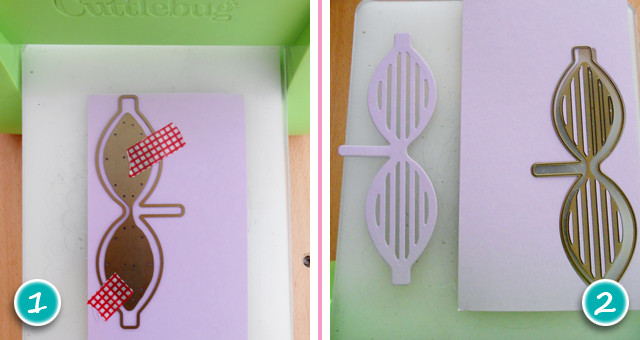 Step 1: Take the plain cutting edge bow die and the detailed strip die and stick to cardstock with washi tape. Run through die cutter.
Step 2: Remove die cut from die, Cut another of just the plain cutting edge die from pink card.
Step 1: Take the plain cutting edge bow die and the detailed strip die and stick to cardstock with washi tape. Run through die cutter.
Step 2: Remove die cut from die, Cut another of just the plain cutting edge die from pink card.
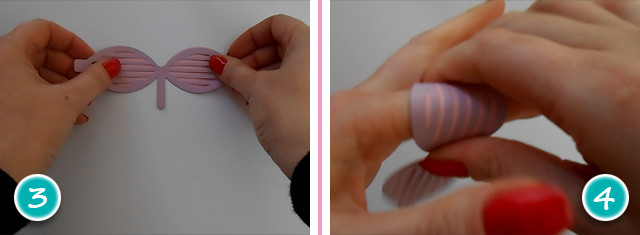
Step 3: Stick the purple strip bow die cut onto the plain pink die cut. Step 4: Take the bow shape die cut and shape around your finger to give a curved shape to die cut.
Step 5: Turn the die cut over and place a dot of glue to the middle area of the bow shape. Step 6: Curl one side of the bow die cut around and hold onto the glue dot until dry.
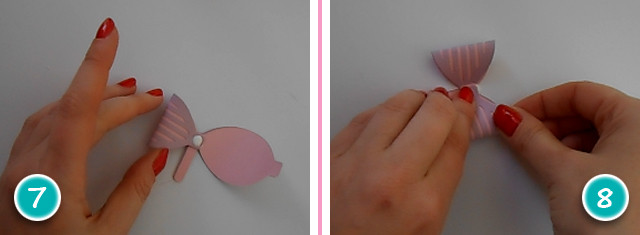
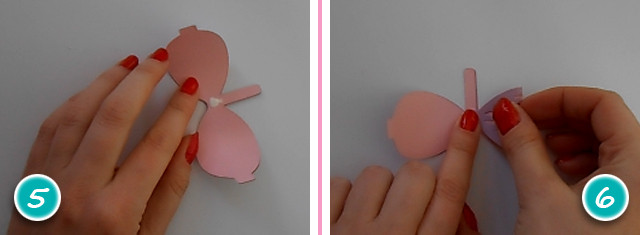
Step 7: Once dry add another dot of glue on top of the tab you just bent around. Step 8: Curl the second part of the bow die cut around and hold in place on the glue until dry.
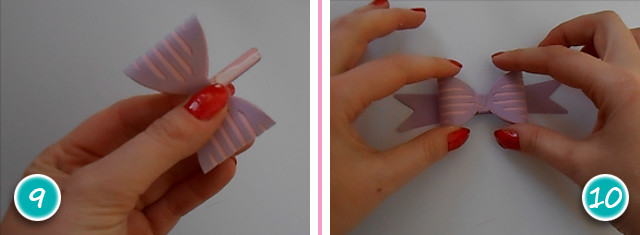
Step 9: On the long thin tab apply glue and wrap around the middle of the bow shape. Step 10: Die cut the plain tail in purple card, you can other lay the bow in the middle…

Step 11: Or cut the tail shape in half and stick behind the bow shape. To finish add a gem or pearl. Step 12: There you have your finished Fancy Bow!
Step by Step: Fancy Bow
Lisa Plummer, the Crafting Diva, demonstrates how to construct a stunning Fancy Bow. From the Gift Box Collection by Creative Dies Plus, the Fancy Bow die set is extremely versatile, allowing you to decorate a range of papercrafts. They also co-ordinate beautifully with the box and bag die sets within the range. Go potty for polka dots or say it with stripes: you choose!
Pick up your Gift Collection dies today!
Step 1: Take the plain cutting edge bow die and the detailed strip die and stick to cardstock with washi tape. Run through die cutter.
Step 2: Remove die cut from die, Cut another of just the plain cutting edge die from pink card.
Step 3: Stick the purple strip bow die cut onto the plain pink die cut. Step 4: Take the bow shape die cut and shape around your finger to give a curved shape to die cut.
Step 5: Turn the die cut over and place a dot of glue to the middle area of the bow shape. Step 6: Curl one side of the bow die cut around and hold onto the glue dot until dry.
Step 7: Once dry add another dot of glue on top of the tab you just bent around. Step 8: Curl the second part of the bow die cut around and hold in place on the glue until dry.
Step 9: On the long thin tab apply glue and wrap around the middle of the bow shape. Step 10: Die cut the plain tail in purple card, you can other lay the bow in the middle…
Step 11: Or cut the tail shape in half and stick behind the bow shape. To finish add a gem or pearl. Step 12: There you have your finished Fancy Bow!
Recent Posts
-

-
 Categories: All
Creative Ways to Use Cover Plate Dies in Your Cardmaking Projects with New Celebrate Blossoms Release from Justine Hovey
New Celebrate Blossoms from It's Just Paper -
-
-
 Categories: AllFree Download
Free Rose Design Digital Papers, Toppers and Sentiments!
Free Floral Digital Papers and Digital Stamps

