Cricut Halloween Pumpkin with FREE SVG
Are you ready to get into the Halloween spirit? We've got a spook-tacular project for you that's perfect for decorating your home during the Halloween season. In this step-by-step tutorial, we'll guide you through creating a stunning Halloween pumpkin decor piece using a FREE SVG file

Hello, crafty friends! Are you ready to get into the Halloween spirit? We've got a spook-tacular project for you that's perfect for decorating your home during the Halloween season. In this step-by-step tutorial, we'll guide you through creating a stunning Halloween pumpkin decor piece using a FREE SVG file available at the end of this blogpost. So, let's dive into the world of DIY Halloween crafts!
Materials You'll Need:
- Cricut machine
- Cardstock in various colours
- Hot glue gun and glue sticks
- FREE SVG file
- Props and a display plate for decorating (optional)
Step 1: Download the FREE SVG File
First things first, download the FREE SVG file for this Halloween project found at the end of this blogpost. This SVG includes a range of elements, such as solid pumpkins, lacy spiderweb pumpkins, individual spiderwebs, a "Happy Halloween" banner, and a pumpkin stem. Feel free to resize and customize these elements according to your preferences.
Step 2: Upload the SVG File to Cricut Design Space
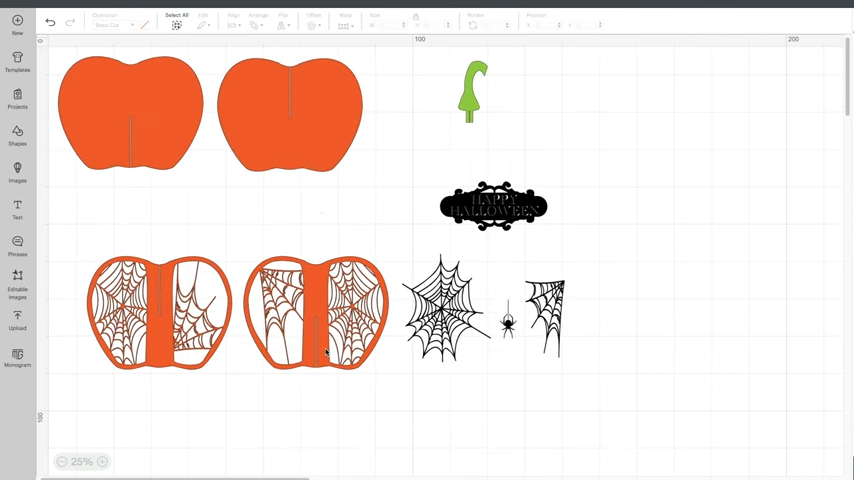
Once you've downloaded the SVG file, open Cricut Design Space and upload the file. You may choose to exclude any elements you don't intend to use for your project. For our demonstration, we'll focus on creating a decorative pumpkin.
Step 3: Cut the Pumpkin Elements

Send the decorative pumpkin elements to your Cricut machine for cutting. For this project, you'll need to cut two sets of the pumpkin halves, both with the slot at the top and bottom. Additionally, cut a solid pumpkin for practice and demonstration purposes.
Step 4: Assemble the Pumpkin Halves

Now, let's put together your decorative pumpkin. Start by slotting the top and bottom halves of the pumpkin together, creating a simple 3D pumpkin. This is the basic structure of your pumpkin decor.
Step 5: Create Multi-Layered Pumpkin Slices

If you'd like to add more layers to your pumpkin for an intricate and visually appealing design, you can do so. To achieve this, follow these steps:
- Duplicate both top and bottom halves.
- Join two sets of halves together, creating double layers.
- Fan out the halves of each pumpkin to form a fuller shape.
By following these steps, you can craft multi-layered pumpkin slices, adding depth and character to your Halloween decor.
Step 6: Glue the Pumpkin Halves Together
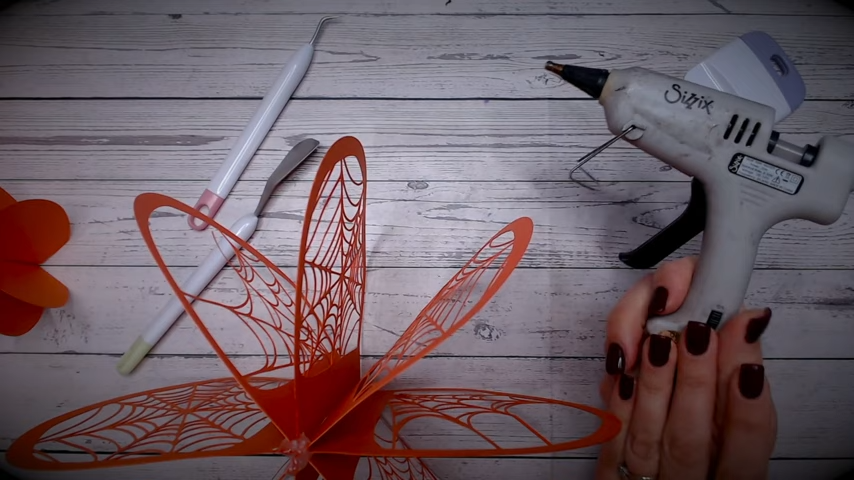
To ensure the stability of your pumpkin decor, apply hot glue to the top and bottom slots and connect the slices together. This creates a strong bond, keeping your pumpkin layers intact.
Step 7: Add the Pumpkin Stem

Now it's time to crown your pumpkin with a stem. Add hot glue to the top of your pumpkin and gently slide the stem into the melted glue. The hot glue provides stability and holds the stem securely in place.
Step 8: Attach the "Happy Halloween" Banner

Using hot glue, attach the "Happy Halloween" banner to your pumpkin. You can span it across several slices, as we've done in our demonstration. Allow each step to dry completely before moving on to the next for a secure hold.
Step 9: Optional: Decorate and Display
Get creative with your Halloween decor! You can use props, display plates, and other decorative elements to enhance the spooky atmosphere. Let your imagination run wild as you set up your Halloween masterpiece.
And there you have it—a charming and haunting Halloween pumpkin decor piece that you've crafted with love and creativity! This project allows you to explore your crafting skills and create beautiful decorations to set the mood for the spookiest season of the year.
Don't forget to explore CraftStash for all the materials you need, including the Cricut machine, cardstock, and more. CraftStash offers the best price guarantee, 10% off for VIP members, and free delivery on qualifying orders. Plus, if you're purchasing a Cricut machine, you'll enjoy free next day delivery.
We hope you've enjoyed this Halloween craft tutorial and the FREE SVG file available on the Craft Stash blog. Be sure to subscribe to our YouTube channel for more exciting crafting projects and tutorials. If you're looking for more creative inspiration, check out our other Cricut project videos.
Happy crafting, and have a spook-tacular Halloween! ?
Watch the full video tutorial here!
Download the free template here:
Related Products
-

-

 Cricut Maker 3 Smart Digital Cutting Machine Mist | EU Adapter & UK Plug£384.99 RRP £429.99 Save £45.00
 -


Recent Posts
-
 Categories: All
New Made To Surprise "Frame It" Collection
New Frame It Collection from made To Surprise -
 Categories: AllFree Download
Made To Surprise Papercraft Society Free Downloads
Free Made To Surprise Papercraft Society Box Downloads! -

-
 Categories: All
Creative Ways to Use Cover Plate Dies in Your Cardmaking Projects with New Celebrate Blossoms Release from Justine Hovey
New Celebrate Blossoms from It's Just Paper -