Framed Monogram Box Tutorial with FREE TEMPLATE
In this step-by-step tutorial, we'll guide you through the process of creating a stunning personalized monogram frame adorned with beautiful layered paper flowers.

Are you looking for a delightful DIY gift idea that's perfect for friends and family or even for selling to others? In this step-by-step tutorial, we'll guide you through the process of creating a stunning personalised monogram frame adorned with beautiful layered paper flowers. You'll be using Cricut Design Space, and we'll also provide free flower shape downloads for your convenience. Plus, we'll list all the materials used, which are readily available from CraftStash. Let's dive right in!
Materials You'll Need:
Cricut Machine
CraftStash Vinyl
Transfer Tape
Pink Cardstock (220-230 GSM)
CraftStash Tools (Weeding Tool, Palette Knife)
8x8-inch Frame
Hot Glue Gun and Glue Sticks
Step 1: Create the Monogram

Open Cricut Design Space and select the "Text" tool. Type the initial you want for your monogram. Choose a font style that suits your preference. Add a rectangle shape that's large enough to accommodate your full name. Adjust its size as needed. Align the rectangle behind the initial so that it forms the shape of a letter. Use the "Slice" tool to cut the initial into two parts, leaving space for your name. Add thin rectangles to create the border lines on the letter. Write your full name in a font of your choice and weld it together. Resize and adjust the lines to match the word's width. Align everything centrally and select everything to "Weld" and "Attach" it.
Step 2: Cut and Apply Vinyl

Use CraftStash Vinyl to cut out your design with your Cricut Machine. Weed out the excess vinyl carefully using CraftStash tools. Apply transfer tape to your vinyl design and remove the backing sheet. Clean the glass surface of your frame. Find the center, mark it, and carefully place your vinyl on the glass, ensuring it's well-centered. Burnish the vinyl to adhere it securely to the glass. Gently remove the transfer tape to reveal your monogram.
Step 3: Create Layered Paper Flowers

Download the free flower SVG files provided by CraftStash. Use these files to cut out multiple layers of flowers from various shades of pink cardstock. Assemble each flower by layering the smallest piece on top, followed by the medium, and then the largest at the bottom. Curl the petals and leaves to add a realistic touch.
Step 4: Decorate the Frame

Cover the backboard of your frame with a matching pink paper to create a seamless backdrop for your flowers. Use a hot glue gun to attach the layered paper flowers to the backboard. Ensure you create an attractive arrangement by spacing the colours and sizes evenly. Leave a border around the edges to fit your frame.
Step 5: Assemble the Frame

Place the decorated backboard back into the frame. Secure the clips to hold everything in place. Ensure that your hook is positioned at the top for easy hanging.
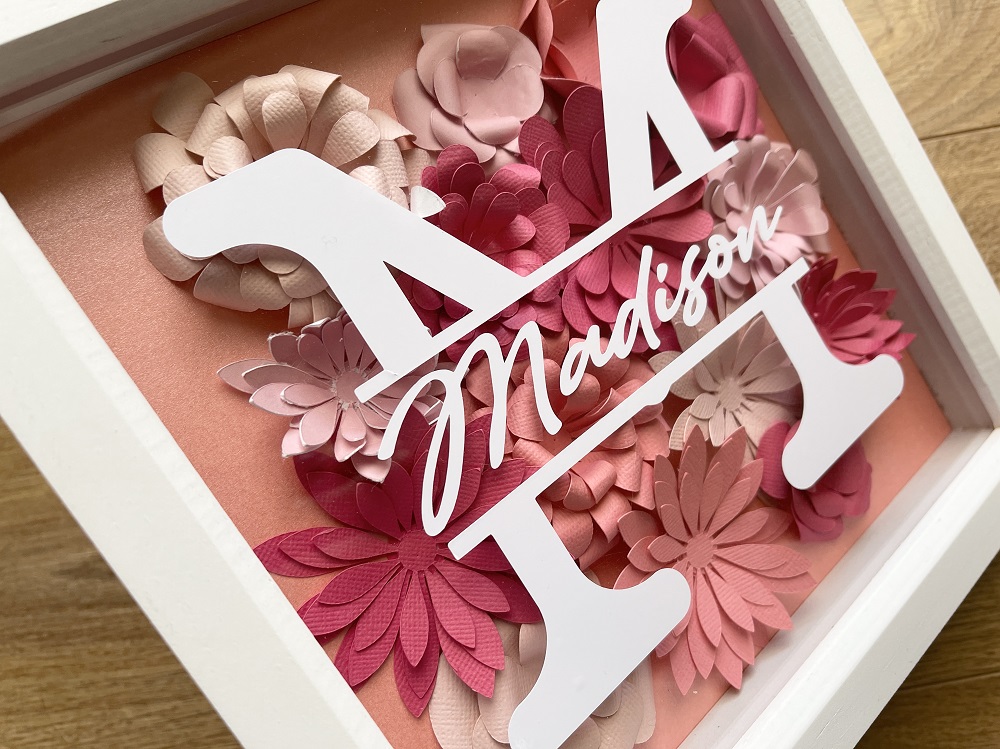
Congratulations! You've created a stunning personalised monogram box frame adorned with beautiful layered paper flowers. This makes for a fantastic gift or a lovely item to sell, thanks to the personalisation options. CraftStash has provided top-quality materials, and with Cricut Design Space, this project is both fun and rewarding. Don't forget to share your creations on social media and tag @CraftStash to inspire others. Happy crafting!
Watch the full video tutorial here!
Download your template here:
Related Products
-


-

 Cricut Explore 3 Bundle | Digital Machine, Easypress Mini Heat Press, Cutting Mats, Tool Set, HTV£397.49 RRP £439.49 Save £42.00Out of stock


Recent Posts
-
 Categories: All
New Made To Surprise "Frame It" Collection
New Frame It Collection from made To Surprise -
 Categories: AllFree Download
Made To Surprise Papercraft Society Free Downloads
Free Made To Surprise Papercraft Society Box Downloads! -

-
 Categories: All
Creative Ways to Use Cover Plate Dies in Your Cardmaking Projects with New Celebrate Blossoms Release from Justine Hovey
New Celebrate Blossoms from It's Just Paper -